Changing Your 90+ Radio Antenna
Contributed By: Tom Bell, IZCC #2802

Changing Your 90+ Radio Antenna
The Purpose of this page is to give the reader a general idea of how to change/repair your 90+ radio antenna.
These goldurned things stick all the time, and never seem to retract all the way. What can you do?
Well, Nissan apparently thought of this, because the Service Manual has a section for Replacing The Antenna Mast. The concern is that, like many other sections of the Service Manual, this one doesn't tell the whole story. So, having replaced two so far and learning what ELSE is involved, I thought I might save someone else the agony of learning at the School Of Hard Knocks. These instructions cover all models. And the entire procedure shouldn't take more than a half an hour if everything goes smoothly.
First, Nissan had the antenna system designed so that the motor should not burn out from a stuck antenna: there's a timer in the system that regulates the motor's operation. So, if the antenna won't go up OR down, the motor's supposed to be OK. You'll know this if you hear it running and nothing happens, then the motor stops. If nothing happens, check the fuse first, then check the connections, as I describe a bit farther down.
We won't be dealing either with antenna masts which have had their guide strips broken off inside the antenna assembly. That requires you to disassemble the antenna motor assembly to remove the broken strip part that was left behind, and I haven't needed to do this, so I can't help out there. We won't cover burned out or non-operational motors either.
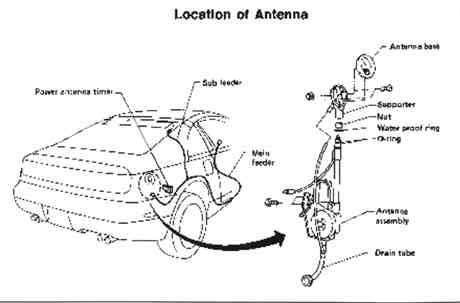
Here's an illustration of what the overall system looks like:
Start by moving or removing the carpet from the trunk floor. Then, notice that there are screws and nuts that hold the trim pieces in place. You will need to remove the center panel under the trunk lock, the right hand side panel and the cover to the ABS actuator if you have a 2+2. The center panel screws on to the back of the car with two plastic thumb screws on top, and two metal screws on the trunk floor. The right hand side panel has a screw to the back of the car hidden under the center panel, and then more than one screw or nut, depending on model, holding it to the floor and the side of the car. You'll need to unplug the trunk light on some models.
Once removed, you have access to the inner fender, you can remove the nut that holds the Antenna Base cover panel on. It's 10 mm, and you can use a socket with an extension easier than a wrench. Once removed, the nut holding the antenna mast in place is visible. This nut is plastic, and has two slots in it. If you've forced your antenna mast down far enough that it's level with the top of the nut, you may be able to get two small flat bladed screwdrivers into the slots and twist until the nut comes loose. Otherwise, get a pair of 'Vise Grip' pliers or something similar, or just pound on it with a screwdriver and hammer (gently, of course) until it loosens up. You should have a new nut and its washer in the bag with your new antenna mast anyway. When the nut is loose, remove it. The antenna mast is now ready for removal.
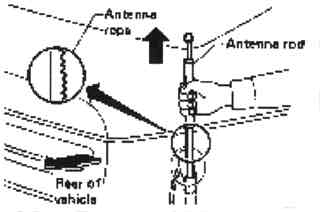
The next part is easier with help from someone, but you can figure out a way to do it yourself. You have to turn on the radio so that the motor tries to elevate the mast, and then pull up on it until it comes all the way out of the antenna assembly tube. Note the direction of the toothed edge:
When you have removed the mast, you 'should' find that there is a short, thin brass tube around the outside of the lowest portion of the mast. This tube needs to come off of the old antenna mast and be put on the new one. Clean it up if it needs it, and I'd suggest a light coating of silicone spray inside of it before you slide it on the new mast. Make sure you keep the flange end of the tube at the top or else it won't go into the antenna assembly tube.
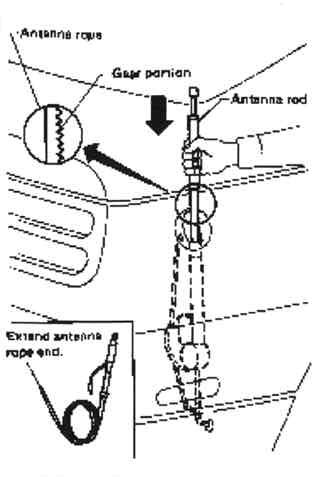
Compress the new mast so that the plastic strip is fully extended. Now, uncurl it and slide the end of it into the antenna tube far enough down that it stops. Have the toothed portion pointed in the same direction as the old one was. Now, figure out a way to turn the radio off, or have your helper do it, so the antenna motor starts up to retract the antenna, and then guide the mast into the tube as the plastic strip is wound onto the internal drum. When the mast is in the tube, the motor will stop, and you will be ready to put the new washer and plastic nut on, and re-assemble things.
Put the Antenna Base cover panel back on and reattach the nut to it, then put the inner trunk panels back in place.
Replacement masts are available from Motorsport Auto, 1139 West Collins Avenue, Orange, California 92667, telephone 800-633-6331. The give a discount to Internet Z Car Club members. Their part number for the masts is 12-1296 for '91-'96 models. They list a separate part for '90 year only: 12-1295. The entire antenna assembly is also available under part number 12-1285.