How to install a permanent aftermarket boost gauge in a 90+ Nissan 300 ZX Twin turbo.
By Henri Le Hir

How to install a permanent aftermarket boost gauge in a 90+ Nissan 300 ZX Twin turbo.
My Z is a 1992, "Continental European" Nissan 300 ZX Twin Turbo, 2+2 (!!) (left hand drive).
 I know
there are differences (a lot of them) between the EURO and the US spec
of the car. Hope that what I found is applicable all around the world.
I know
there are differences (a lot of them) between the EURO and the US spec
of the car. Hope that what I found is applicable all around the world.
Before you start, please read that document from the beginning to the end, and check that there aren't differencies that will prevent you to successfully install the boost gauge.
My A Pillar Boost Gauge Kit comes from Jim Wolf Technology, and I'm pretty sure that it's the same as the STILLEN one.
Basically, it's a mechanical boost gauge (with a light bulb and some wiring), a A pillar housing, some hoses, and a T fitting.
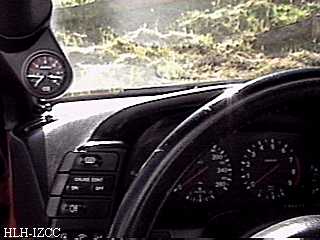
If you follow the procedure, you'll go from separate parts, to the following result, it about one hour.(ooppss, sorry, I can't help you with the 280 km/h speedo)
Tools required for the installation : One swiss army knife
Getting the boost hose through the firewall
Well, the instructions that come with the gauge says "drill the firewall", but I wasn't very pleased by the idea, so I tried to use an existing opening.
Took me some time, but I finally found one.
First of all, open your hood (use the second catch to open it as much as possible), and it will help if there's some light just above the engine bay (the sun at 11:00 works great)
Put the driver's seat all the way back. It'll help.
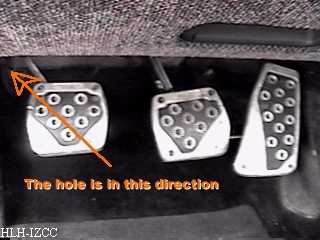
Put your head under the dashboard, look on the firewall, upper left of the clutch pedal when it's fully depressed
There, you'll find some dampering material on the firewall, something looking like gooey stuff, and some cables that will go right through the firewall.
 There,
you'll find some dampering material on the firewall, something looking
like gooey stuff, and some cables that will go right through the firewall.
There,
you'll find some dampering material on the firewall, something looking
like gooey stuff, and some cables that will go right through the firewall.
You will have to cut (gently) through the sound material, close to the gooey stuff. If your hood is open, it's likely that you'll "see the light". This is the opening you'll use .
The boost hose I got is white, so for clarity reasons, I "outlined
it" in orange.
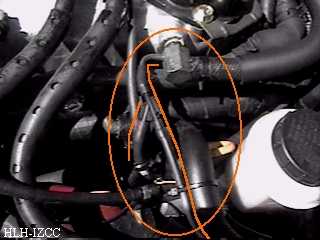
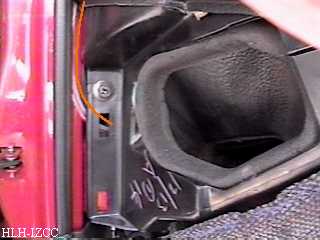
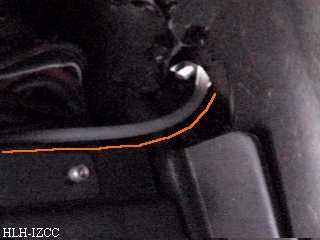 Here's
a close up of the location
Here's
a close up of the location
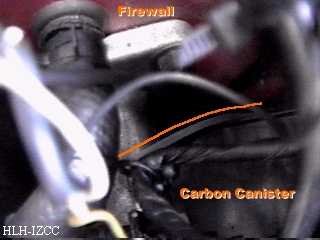
In the engine bay, the hole is right behind the carbon canister, and it's extremely difficult to see the opening, even if you KNOW it's there.
The best way to get the hose is from the interior, to the engine bay. You'll have to angle it, so it'll go upwards, and you should push about 25 cm / 10 inches before it'll show up in the engine bay. For that process, it's useful to have some help.
Here's how it looks like when you finally get it.
When this is done, then the hardest part is behind you.
The opening has a gommet to protect the wires from being eroded by vibrations against the firewall.
So if you ever removed it, put it back.
Connecting the boost gauge hose somewhere in the engine bay
 This part
is (relatively) very easy.
This part
is (relatively) very easy.
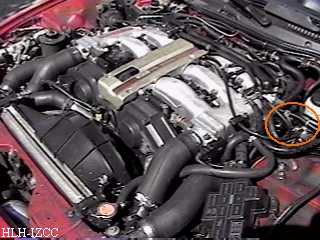
Here's the location in the engine bay where you want to connect the
boost gauge
You want to connect the boost gauge hose here
Take care to remove the right hose.
It's the one connected to that big hexagonal piece, via a metal "nipple".
That hose had a RED mark on it. Using the T fitting, you'll reconnect
the original hose, as well as the boost hose.
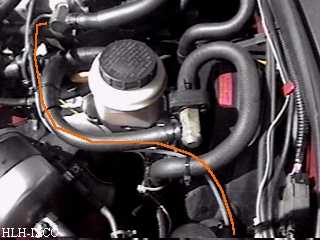 Here's
how I routed the hose in the engine bay
Here's
how I routed the hose in the engine bay
So now, you can test if your boost hose is properly fitted. Start your engine, and you must immediately feel some depression on the boost hose (put your finger on it), as well as a hissing sound. It's also normal that if you put and remove your finger from the hose, then your idle timing will change.
Do NOT drive the car now.
The electrical connexion
My gauge has a bulb for night driving, cool.
In the beginning, I wanted to have it connected to a dashboard light, so it would dim as well.
After 3 hours with my nose under the dashboard, I finally decided that it wasn't such a good idea, and that anyway the bulb wasn't that bright. As I anyway wanted to have it lit only when the lights were on, I finally to connect it to the ashtray lamp.
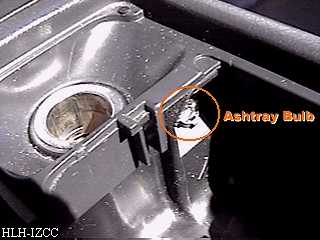
It has several advantages: the connexion is protected by a fuse, and it's easy to reach
To get some wires, I simply used some regular household wires.
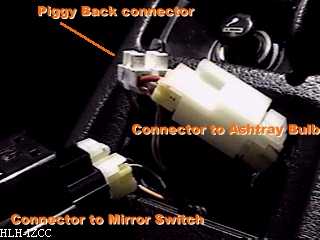
To connect them, the best way is to remove the mirror-control switch.
>From here, you'll be able to pull out a BIG connector, with only two wires
on it, it's the one that goes to the ashtray bulb. Connect the boost gauge
wires in parallel to these one. To do so, I used some easy "connectors",
coming from my local equivalent of the K-Mart
In theory, you only have to connect the "hot" wire from here, and ground the other somewhere. The problem is that it isn't that easy to find a good ground close to the A pillar.
Another option is to open up the dashboard, and to connect in there.
But it's awfully complex to reach in there, you would have to drill through
the plastic material, not to mention the possible electrical gremlins you
may then raise in there.
 I routed
the wire from the A-Pillar, down to the dashboard side plate, then under
the steering wheel, then down by the radio in the center console, then
by the gearbox lever, and finally to the connection.
I routed
the wire from the A-Pillar, down to the dashboard side plate, then under
the steering wheel, then down by the radio in the center console, then
by the gearbox lever, and finally to the connection.
Finally, you have to remove the upper window molding, so then you can remove the A-Pillar plastic cover
To get them out, simply gently pull the rubber molding, and pry the pillar plastic cover. The cover is hold by "snap in" fasteners, so it's really easy.

To connect the boost hose to the gauge, just follow the instructions enclosed with the gauge.
To fit the gauge inside the mount, you may have to modify the mounting kit. I also decided not to glue the boost gauge inside the mount. As the fitting is pretty tight, I just pressed it inside the mount. Until now, the gauge is still solid in place.
From here, you just have to check that the light is working, so you can put the gauge housing on the A-Pillar.
Then, put the window molding back in place (if you do it incorrectly, you'll get wind noises)
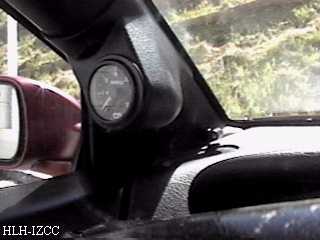
And here's the result
If you have any info, or comment, feel free to contact me.
Written by H. Le Hir / 970901@22:51 email 100031.1520@compuserve.com