The 300ZX Audio and Interior Page

Created : ??????
Last updated: 9805
05/98 - I finally put some more info and photos online...
Please email me (gt7096a@prism.gatech.edu) if you have any comments, suggestions,
etc. Thanks!
Index
The Original Bose System
Read The Bose FAQ and you'll find some
interesting opinions about
Bose systems, their reputations, etc. This
is a popular FAQ for home audio enthusiasts, but much of what is discussed
applies to the car systems as well.
The 91+ bose systems used four 3.5" speakers, one in each corner.
The 90 system had 3.5" in the front, and 6" in
the rear. The bass response is about the same out of each of them. There is a relay
in the passenger-dashboard area that turns on the amps in each speaker housing.
Here's my opinion on the bose Bose system:
It's overpriced, overengineered, and gimmicky.
The head unit (tape deck/radio) is manufactured by Clarion.
Each speaker (one in each door, two in the hatch area) is built into
a large injection molded plastic enclosure. Each enclosure not only
houses a speaker, but also a seperate amplifier! As far as I know, Bose
themselves make the speakers, which I *think* are very similar to
those found in the Bose 101s/901s, etc. It doesn't sound bad
but it could certainly sound better.
The optional CD player is made by Sony. It plugs into the Bose/Clarion
tape deck via a 5 pin connector for 90-91, or in 92 I heard they
changed to an 8 pin connector.
If you didn't have the CD player, you might have gotten the Bose
"center channel" -- a passive speaker that pretty much works like magic,
sucking a little bit of the signal off both the left and right door
speakers. Contrary to what Bose may have you believe, this is not really a "good"
idea in terms of accoustics. It is a neat trick, though.
The Bose setups in Nissans in general are NOTORIOUS for failing early.
They are poorly made. If you have a single speaker that has stopped working, and you'd
rather not spend a fortune on replacing the whole system, you can
get a dealer to send your speaker in to be "refurbished."
The following information was provided by Steve at Courtesy Nissan on
costs for "refurbished" components.
You can take any individual component into a nissan dealer, and they will send it back
to the original manufacturer, who will replace it with a refurbished (previously broken
but repaired and reconditioned) part. The process takes 4 to 6 weeks, and the replacement
part has a 1 year warranty. Courtesy Nissan's prices for the service are as follows:
- AM/FM Cassette $145.00
- Single CD $175.00
- Multi CD $225.00
- Bose Speaker $155.00
You may have noticed -- this isn't cheap! If you're determined to keep the stock
system, I'd suggest looking around for someone who has upgraded their system, and will
sell you an old speaker assembly for a reasonable price. The speaker/amp/housing combos
seem to sell for anywhere from $50-$100 used.
Should you Replace it?
If you want better sound quality, then yes, by all means, replace
the BOSE system. Unfortunately, it's a job that's easier said than done. Because
of the propriatary design used by Bose (the amplifiers attached to each speaker), it
is very time consuming and/or expensive to replace.
If you put $700 into a stereo, you would foolish to spend less than $200 on
an alarm. I would never own an expensive aftermarket stereo without protecting it.
Your best choice, if you have the money (and expect this to cost between $600-$2600) is
to replace the entire setup. This can be broken down into five main components:
- The Head Unit
- Front Speakers
- Rear Speakers
- Amplfiers (optional)
- Subwoofer (really optional)
Replacement options
- Update -
There are now a number of aftermarket adapters available to let you upgrade the head unit or speakers
seperately. IE you can buy that Kenwood CD player you've been lusting after, and use it with your
stock Bose speakers. This is the easiest and most cost effective way to upgrade your system. However,
the bose speakers are still the weak point in the audio chain, and will give you trouble down
the road. For that reason, I still think the best plan is to upgrade everything - but if you just
want to be able to play CDs in your Z, upgrade the head unit, get one of the adapters, and you're set.
The Head Unit
Luckliy, the Bose/Clarion head unit is a standard "DIN" size. This means that nearly
any radio will fit in with only a minimum of effort. There are a number of
good offerings in any price range. If you are trying to keep costs down, you will want
a head unit that has a built-in amplifier (this is the normal way to do it). Try to
get one that offers at least 18 watts per channel, which you'll usually see designated
as "18x4" for 4 speakers. Avoid head units which only provide 2 channels of amplification -
you'll regret it down the road. If you plan on ever expanding the system, you may want
to consider investing in a head unit that has "RCA outputs" which will make it easier
to add an external amplifier later. Again, if you're happy with the Bose speakers in your
car, you can get a new head unit along with an adapter, and hook it right in.
The speakers
This is a tricky subject. Because of the BOSE design, when you change the head unit,
it's definately in your best interest to change out all 4 speakers as well. The "problem" with
the bose system lies mostly in the speakers. HOWEVER - if you want to replace just one half of
the system (either the head unit -or- the speakers, but not both) there are now a number of
aftermarket "converters" available. I'd recommend calling
Crutchfield and asking them what they have available to help you out.
When you remove the Bose speakers, what you'll actually be taking out are four large
black plastic enclosures. Each one weighs about 8 pounds, and takes up quite a bit
of space.
In short, when you take the speakers out, what you're left with are huge gaping holes in
your car. To mount new speakers, wood cutouts must be made, attached where the enclosures
used to be, and then you must mount the new speakers in these cutouts. Your other option
is to go to your nissan dealer and buy the metal mounting brackets that were standard for
the non-bose speaker system. This would be a great idea, and the next time I take
my door panels off, I'm going to replace my wood cutouts with the stock metal ones. Hopefully
they'll seal the speaker tightly against the door...
When done correctly, it is possible to replace all the Bose speakers with new 6" or
6.5" drivers. This is probably the best situation, as it allows you to get good bass
response out of speakers mounted in the factory locations, without compromising
sound quality. Note that without a subwoofer, it is very difficult to get much low
bass response out of your Z. The problem is largely that the car is so well built and
padded -- the car does a very good job of absorbing noise in the cabin.
The first step is to determine your budget. Plan on spending significantly
more money on front speakers than on rear speakers. If this sounds wrong to you, think
of home stereo setups, which typically use two large, expensive speakers in front, and
either none, or small "ambiance" speakers in the rear. This is how car audio is
supposed to sound as well. The common practice of setting your fader to deliver
equal power to the front and rear speakers isn't right either - you should be hearing almost
all of the sound from the front.
Since you want the best sound possible out of the front, it is generally agreed that
"component" speakers will sound best. These are speakers where (just like home audio)
the woofer and tweeter are two seperate components. The woofer will mount behind the
BOSE plate at the bottom of the door, and then you mount the tweeter on the door, or
in the side air conditioning vent. (no, I'm not kidding!) I originally had my component
tweeters mounted in the air vents, because it left the interior looking totally stock. However,
after a few months of this I just wasn't happy with the sound. So one day I got brave and
attacked my door panel with an x-acto knife and a power drill. The results? Some beautiful
flush-mounted tweeters in the door panel. Check out this photo - you can see the tweeter
mounted to the left of the air vent - they really look stock.
So. You can fit a set of component speakers that contain up to a 6.5" woofer and a 1"
tweeter in the door. A wood panel (or factory nissan part) must be made to contain the woofer, which will fire
out through the BOSE grill. (this way no one can tell what kind of system you have,
thus it will be less likely to get stolen) The tweeter you can mount on the door, the
inside of the side mirror, or in the air vent. Mounting in the air vent really does
provide good sound, and will also increase the "stealth factor" which means it's less
likely that some sleazeball will be walking away with your expensive speakers.
If you don't want to spring for component speakers, your next choice should be a pair of
quality "coaxial" ones. These have a tweeter mounted in the center of the woofer. Again,
this is a very good choice for those who want to retain the stock look. It may not sound
QUITE as good as seperates, but it will be much more unobtrusive. I chose to use coaxials
for my rear speakers. The only possible problem
you'll have is if the tweeter sticks out too far from the woofer, and it may rub against
the BOSE grill. I don't have measurements yet for what will and won't fit, so good luck!
For my install, I chose 6.5" component speakers in the front, and 6.5" 2-way speakers
in the rear. I spent approximately 70% of my speaker budget on the fronts, and 30% on
rears. This is because, when set up correctly, at least 70% of the sound you hear should
come from the front speakers. The rears should only be used for "ambiance" sound, and
while not having ANY rear speakers leaves a slight deficiency in the sound, they should
play a small role at best.
Amplifiers
If you think you'll need more power (and until you hit at least 25 watts per channel, more power
will definately result in improved sound) then you can add external amplifiers to your system. If
you're thinking of adding a subwoofer, you definately need an amplifier to
power it. Seperate amplifiers are typically rated just like head units, in watts RMS. Be
careful of "maximum power" ratings, because these give inflated numbers. For good seperate
speakers, you need at least 35 watts per channel RMS. For a subwoofer, you'll want at least
80 watts. Rear speakers, again, can suffer with lower power levels. In my setup, I amplified
the front speakers and subwoofer, but left the head unit (rated 25x4) to power the rear speakers
alone.
Amplifiers can have either low level or speaker level inputs. Low level inputs are connected
with "RCA" cables, just like home stereo components. The big advantage to using low level inputs
is that the signal is better preserved. If you already have a head unit with speaker outputs,
though, many amplifiers will allow you to use those as input, which makes
your job of upgrading a little bit easier.
Outboard amplifiers require an input signal (speaker or low level), a power line going directly
to the battery, a solid ground, output to the speakers, and a turn-on lead to the head unit. As
you might imagine, this is an awful lot of work. However, the benefits are
very precise, dynamic sound, and if you're adding a subwoofer, you probably don't have a
choice about the issue.
There are a number of mounting options for amplifiers. One common place to stick them is under
the driver's or passenger seat. I wouldn't recommend putting one under the driver's seat, because
the electric seat motors could accidentally crush it or become damaged. However, if you experiment
with a phone book, you'll find that you can fit an awfully big amplifier under the passenger seat. So
play around until you find an object that you can just barely fit, and then go amp-shopping using those
dimentions as a maximum. The passenger seat is easily removed - it is held in with four large bolts,
and lifts right out.
Subwoofers
These days, everyone knows what a subwoofer does. Remember the bone charring bass that woke
you up the other night at 4am? Yup, couldn't you use that in your Z?
Probably not. However, even after you replace your Bose setup, chances are good that you'll
still be looking for more bass in your ride. This can be easily accomplished by adding a
subwoofer. There are many prebuilt options: the "bass tubes" which often come with built-in
amplifiers, cheap rectangular boxes where you drop in your own speakers, and even some
very expensive (but very good) models available specifically for the 300zx hatch from
JL Audio. Expect to spend between $100-$400 for a simple
bass tube, but the prefabricated JL jobs will run you $500-$600, amplfier not included!
Alternately, you can hire a shop to build you a custom box, or if you have the talent, you
can build your own. I keep hoping to put some plans online, but never get around to it.
I would strongly
recommend that you put serious thought into the issue, as space is so limited in the hatch
area already, and there is nothing more obnoxious than a poorly designed system. If you build
your own, you can get away with a nicely done enclosure for under $50, and you can add a
high quality woofer for less than $150. Custom stereo shops will typically charge between
$100 and $200 for the box, but you're paying for their experience.
Replacement Procedure
Make sure to read all instructions and check out all applicable photos before
attempting any of this.
The Factory CD Player
The factory CD player in the 300ZX is manufactured by Sony exclusively for Nissan. (or is
it Bose? Maybe even Clarion?) In other words, you can't call up Sony and ask for one.
Rumor has it that the player is out of production, so you'd either have to stumble across
one that was sitting in a dealer's inventory, or buy a used one.
To install the CD player, you follow the instructions below regarding removal of the head
unit. The CD player bolts in directly under the head unit with very little effort. The
90 and 91 CD players have a 5 pin DIN connector, and a wiring harness addon that is
used to hook it up to the stock tape deck. The 92 and later ones use an 8 pin connector,
so make sure you try to get a player from the correct year.
Many people have asked me this, and in fact it happened to me when I sold my stock CD player
to someone on the net. WHEN YOU REMOVE YOUR CD player, you'll find that there is a Y-shaped
adapter that connects it to the radio wiring harness. Without this 8" section of wire, the
next person won't be able to install the player in their car. They can be purchased from
Nissan for $15-$20, but if you're taking out your CD player, you'll never need that wire,
so make sure to remove it at the same time.
Removal of the stock head unit is quick and easy. There are FOUR screws
which hold the center dash panel in place. Get a medium (#2) phillips size screwdriver,
and sit down in the driver's seat. At the top of the center dash panel is a long thin
air conditioning vent. Look carefully at the sides of the vent - the tapered edges are
actually plastic caps that are covering up two screws! Pry them straight outward with
your index finger, but be careful not to let them drop down inside the air vent. You
should have revealed the two upper screws.
Underneath the adjustable A/C vents, but above the radio, you will see a black metal cover,
about .5" tall and 7" wide. Pry GENTLY outward on this. It *IS* metal, so it is hard to
break, but do be careful. There are two metal spring clips holding it in place. It snaps
straight off - you may need to use a flathead screwdriver, but it doesn't take too much
effort. Thus the other two screws are revealed.
Unscrew these 4 screws. Again, DON'T drop them into the A/C system -- a magnetic screwdriver
is a good investment for this job, "just in case." Put them somewhere safe, such as the
ashtray. At this point, there are just a handful of clips holding the center panel in place.
Pull gently at the top of the panel, near the AC vents. The top should pop out, and then
with a little gentle wiggling back and forth, the bottom will come out as well. The
clock is still attached, so don't pull too far! You will have just enough room to
reach down to the clock and disconnect the electrical connector. If you can't get it off,
you can alternately unscrew the clock from the plastic center piece.
At this point, you should have the whole center panel off, and you should have easy access
to the radio. The radio is attached to DIN opening underneath it, which will either have
the center speaker, the CD player, or the "stuff holder" depending on the options that
the car came with from the factory. You will see 4 screws that hold a metal bracket
into the car - remove these 4 screws, and the radio assembly will come out. If you're replacing
the head unit entirely, this wire colors chart will come in handy.
Removing the Front Speakers
Removing the front speakers is NOT a job for the faint of heart. The entire door panel
must be removed, and as mentioned earlier, wooden speaker mounts must be fabricated out
of 1/4" or 1/2" wood. You will accomplish nothing by trying to remove
the bose grill in the door. It is not made to come off, and you can't get to anything
important anyway.
Instructions for removing the driver's side door panel:
- Tools required: Socket set, #2 phillips screwdriver, #3 phillips screwdriver (MAGNETIC
RECOMMENDED!), small flathead screwdriver
- First, roll down the driver's side window approximately 6 inches. If you look at
the door from the outside, you should be able to see a round plastic cutout near the
rear of the window track.
- Turn off the ignition, and open the driver's side door. You'll want to set down a large
cloth to kneel on, and also find a safe place to set the screws you'll
remove.
- We will arbitrarily start by removing the upper section of the door, where the seatbelt
attaches.
- First, pry the plastic cover off the upper seatbelt mounting point. This should
come off without much effort, revealing a large bolt.
- Use socket set/adjustable wrench to unscrew this bolt. There will be 4 or 5 washers
that will come off with it. They will not fall off, so don't
worry about them.
- When you are done, allow the seatbelt to retract into the door - the bolt will stop
it safely.
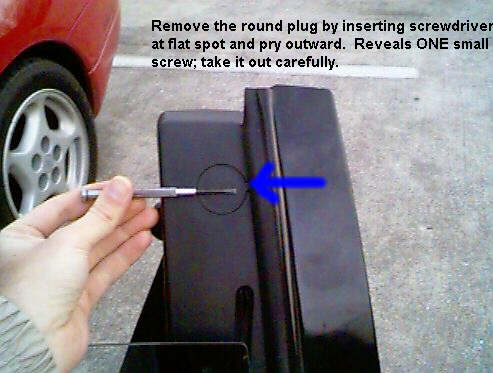
- Now go around to the outside of the door. You will see that the circular cutout
(opposite the side where the seatbelt mounted) has a "flat spot" on one side. Use
your flat screwdriver to pry the plastic plug out at this point. It should snap
off easily.
- Look into the hole. You should see a small screw or possibly a bolt head, which
is holding the inside door piece in place. Remove this screw/bolt, and be VERY careful
not to drop it into the door.
- Once that screw is removed, the very topmost part of the door panel should be loose.
pull on it gently, and two metal snap-clips at the bottom will come out, and the 3"
by 8" section of door panel will be free. Put it in the hatch for safe-keeping.
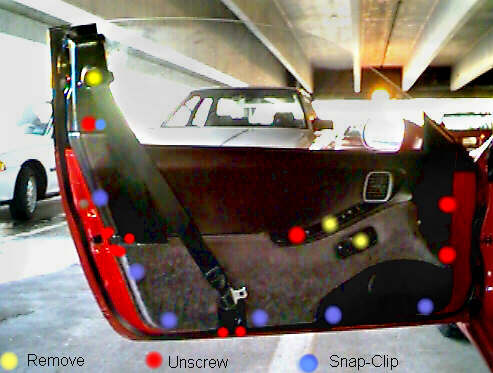
- Next we will focus on taking off the large section of the door panel (see photo).
- Taking off the top section should have revealed two screws which hold the big panel
in place. Remove them.
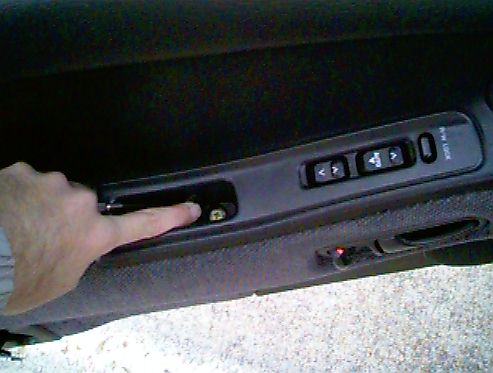
- The molded plastic assembly that contains the window controls and the "hand grip"
is all one piece. There should be black (?) carpeting at the bottom of the "hand
grip" hole. Use your flathead screwdriver to lift up the carpeting at both of the edges
down in the little hand hole. Yes, there are two screws hidden down there.
Remove them. Lift up on that edge, and you'll sense resistance from the upper edge,
by the stenciling that says "window controls" ... slide a small flat screwdriver into
the upper edge, and you should help to release a clasp. The window control/hand grip
piece will lift straight up, and the plug going to the window control will unsnap.
Again, put the piece into the hatch for safekeeping.
- Lock the door. Now pull out gently on the (inside) handle. Use your
other hand to pry the plastic cup that sits behind the door handle out. There are 2
snaps on both the top and bottom. It will take some wiggling to get the part out -
you'll end up locking/unlocking it and playing with the handle for a bit, but the part
should come out with no trouble. Throw it in the hatch.
- At this point, all the "secrets" of the door panel are gone.
- Along the perimeter of the panel, you will find a number of screws. There are two at
the front edge of the panel, with plastic washers. There are two at the bottom, holding
the plastic seatbelt guard in place. There are three screws holding the rear
seatbelt protector in place.
- Beyond these screws, there are the dreaded snap-clips which are common to nearly all door
panels. Be very careful with these. If you have never removed a door
panel, it's a given that you're going to break some. Probably 60% of 'em. Basically
what you do now is go around the perimeter of the door, pulling on the edges. They
will "pop" loudly when they release. Off the top of my head, there are 2 or 3 on
each edge, and 4 or 5 along the bottom. Eventually you will have all the edges free.
- To actually take the panel off, pull out the seatbelt a bit so you have some slack. Now
pull outward on the bottom of the panel, and lift up gently. The panel will break
free without very much effort. If you're working hard to get it off,
you've probably got something that's still attached.
- When you get the panel off, the seatbelt will still be threaded through it. Gently pull
it out until you reach the end of the belt (a few feet) and set the entire door panel
gently down on the ground, leaning against the door.
Whew! Break out a 6-pack, because you're finished. Removal of the passenger
side door panel is almost identical - one exception - there is no "hand pocket" on the passenger
panel. Instead, there's a molded grip, with screws hidden behind round vinyl covers at both
the top and bottom that hold it on. Take that off, and then follow the other instructions.
Replacing the Rear Speakers
Replacing the rear speakers is quite a bit easier, but it is still a very time-consuming
job. There is NO way to get the speaker out through the little rectangular
hole. Instead, you have to remove all the body panels in the hatch from around the speaker.
- Tools Needed: Socket Set
- First, remove the rear (hatch) carpet and tie-downs.
- Take off the removable pieces. There are two panels that provide access to the
taillights from the inside - these snap out easily. Then remove the speaker grilles, by
pulling up on the inside edge of the cloth cover. The inside edge will
pop up, then pull sideways to release the outside edge. If you still have the vinyl
cover that keeps people from looking into your hatch, unhook it from the hatch, and then
remove the winding assembly by pulling it straight up at each end.
- The first panel to remove is at the rear of the hatch, dead-center. It is held in place
with two large plastic thumbscrews, and a few nuts at the bottom. Remove them, and the
center piece should come out easily.
- The two panels to the right and left of center should also come out easily. They are
held in place with a number of nuts screwed into the bottom and sides of the car.
- Next you remove the panels that are actually covering the speakers. Same story - find
the nuts and screws, remove them, then lift the panel out.
Installing an aftermarket CD Changer
Okay, so maybe you like the Bose setup, and you just want to install a CD player. If
you can't get your hands on a factory player, and/or want the convienence of a 6 disc
changer, that's a definate option!
You'll have to add an "RF-Style" CD-changer. These changers essentially broadcast CD
sound over your current FM radio. This is good, because it means that you don't have to
get into any hardcore wiring issues. This is bad, because it means that the sound quality
of the CD player will be limited by the sound quality of your FM radio. Realistically,
though, if you're happy with the sound from the stock system, you'll be happy adding a CD
changer.
One owner's experiences in adding a CD changer
More to come real soon! Keep watching!
You really got me (midi)
Credits
Page written and maintained by: Adam Lotz - gt7096a@prism.gatech.edu.
People who submitted significant contributions to the page:
- Rob Wunsche - CD changers
The Fiend Homepage
Adam's Homepage
Back to the IZCC 90+ How To Index Page
Text on page copyright ©1996, Adam Lotz. Content may not be reproduced
in whole or in part for commercial reasons without prior authorization.
Send email to gt7096a@prism.gatech.edu for more details.
Notwithstanding any language to the contrary, nothing contained herein constitues
nor is intended to constitute an offer, inducement, promise, or contract of any kind.
The data contained herein is for informational purposes only and is not represented to
be error free.