STOP THAT Z !!
Installation of Toyota four-piston calipers for 240-280Z
 by CraigMarcho
The road is smooth......I'm doing about 65.......no one around me.....ISLAM on the brakes as hard as I can! My body wants to fly through the windshield,but my seat belts do their job and hold me tightly to my Koenig seat. My1973 240Z screams to a halt in similar fashion to a Formula One racergoing 200 mph braking late into a hairpin corner! Wow! Looking in the rearviewmirror, I notice no black streaks on the pavement from tire lockup. I quicklystomp on the accelerator and change up through the gears to do it all overagain!
Why would someone punish their Z-car like this? How can MY Z-carhave braking power like that? Who's the weird guy trying to give himselfwhiplash? You might be asking yourself one or more of these questions, andin the following paragraphs, you'll find the answer to the first two, I thinkyou can figure out the answer to the third!
If you drive like I do, thenyou probably wish your Z had better braking capabilities! It seems that thebrakes of early Z-cars were only designed for basic day to day driving, andnot with the true performance enthusiast in mind. One way to increase yourstopping power is to replace your Z's front calipers with four-piston caliperslike those found on a Toyota 4wd truck. These calipers are basically a bolt-onmodification. "Why do they fit so easily" you might ask? These calipers weremanufactured by the same company, Sumitomo, and as luck would have it, usedthe same mounting location. The job is very simple, it consists of removingthe old calipers, and replacing them with the new ones. That's it. Well,maybe a little more, but as you are about to find out, this is a very easyupgrade to your brakes that will gain impressive results! To upgrade to the4-piston style calipers, you will need to locate and purchase the followingstuff from your favorite parts house, or dismantling yard:
One set of four-piston calipers from Toyota 4wd Truck (1979-1984)
Brake fluid
New brake pads
Wheel spacers (may be necessary if usingstock wheels)You alsomay want to consider picking up the following things, although they are notnecessary for the conversion, it may be a good idea tohave:
Brake partscleaner
Wheel bearings (if you need new ones, now is a good time to put'em in)
Stainless steel braided brake lines
Semi-Metallic brakepads First, you beginby getting your hands on some calipers. I opted to find mine at a localdismantling yard, although an alternative is to buy them new at an autopartsstore or your local Toyota dealer. Being on a very tight budget (who isn't!)I got mine used. Make sure that you find some that are still on the truck,this way you can see how they are assembled with pads and clips, and you'llalso want to mark on them which side they belong on (drivers/passenger).Once you get them, clean them up at the local carwash using degreaser first,then using the brake parts cleaner. Be sure to tape off the ends of the linesto prevent water from contaminating the brake fluid inside the calipers.Next, to make them look nice, I painted them using regular aluminum paint.

After cleaning and prepping the calipers,remove the old Z calipers. The backing plate will need to be trimmed witha hacksaw somewhat to make room for the larger calipers. To do this, youmust remove the rotor.
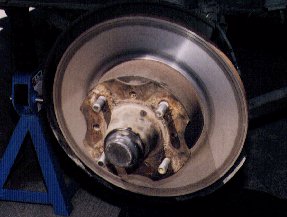
This wouldbe a good time to replace/re-pack wheel bearings if you need to. Before removingthe rotor and plate, you may want to set the new caliper in the approximatelocation to get an idea of how much and what needs to be trimmed. The backingplate is held in place with four phillips' head screws.

Mine were on pretty tight, trying tounscrew them really messed up the head of the screw, so I used good ol' vicegrips to break the screws loose. When they are broken loose, you can finishunscrewing them with your screwdriver. Once the plate is trimmed, attachit back in its original position, and install the rotor. On this particularcar, the backing plate was left off to aid in cooling the brakes, but youmay want to retain yours to keep dirt and debris off of your rotors.
Next, install your brake pads, semi-metallic were used in this swap (theywere supplied by the nice people at Performance Toyota of Plano). You maywant to buy some of the "anti-squeal" compound that you spread on the backof the brake pads. The new calipers will now bolt into place where the oldones were.

You can use the same bolts thatwere on the old Z calipers. In case you didn't mark which side the calipersgo on, or bought them new and aren't sure, the larger diameter pistons andthe bleeder screws should be on the top half of the caliper when installedcorrectly.
Now comes the hardest part, for me anyway: re-attaching thebrake lines. Some minor bending of the brake lines is necessary, just becareful not to pinch them. It took me a little while of working the braketubing around so that the line would match up with the hole on the caliper.After attaching the brake lines, a good bleeding is in order.
Next, mountthe tire on the rotor to check for clearance. Depending on the type of rimyou have, some wheel spacers may be required to accommodate the larger calipers(you can find spacers at most auto parts stores). Usually, most aftermarketrims, and 15" Z rims will be able to be mounted without any spacers, youwill just have to check your particular rim to see exactly how much roomyou have. Just for reference, I have 14x6 280ZX six spoke aluminum rims,and I had no problems with clearance.
Once the tires are mounted, youare ready to head out to your favorite private testing facility! Now, yourcar may not stop like a Formula One car, but, with everything done properly,you should feel a noticeable difference in your Z's stopping ability. Goodluck!
Special thanks to:
Mike Young
Performance Toyotaof Plano
1001 Preston Road
Plano, Tx.
1-800-275-8696
(Askfor Mike, mention this article, and
he'll give you a 10% discount onparts)
Back to home page.....