
Created : 971013
Last updated: 981111
Editing notes for Andy
Items to be bolded are starred
Items in brackets [] are comments and are to be deleted before publication
NEW
end NEW
1 Introduction
Every couple of months a Z car owner somewhere cries out "Help, my car is suffering from hesitation/stumble: what could be wrong?" . These types of problems can be a pain to track down, and if the problem is an intermittent one, it can be months before the cause is found. With my 1991 TT, last year I was on a 400 mile trip with about 50 miles to run. I decided to pull over in a small town for a break. As I was part way through a U turn, doing about 5 mph, the engine stumbled and cut out. Power steering dropped out, but luckily I was able to bring the car to a stop just in time to avoid smashing into the footpath (sidewalk). Started the car again, and you know, this problem has never happened since.
The problem I had was with my 1990 NA, which had mysteriously developed a deep hesitation whenever the car moved off from rest. The engine would idle perfectly, but as soon as you put your foot on the gas pedal, the revs would drop from 800 to about 500 rpm, then slowly build back up then from 1000 rpm everything would be fine. Whenever you took off from rest, the harder you jumped on the gas pedal the deeper and longer the hesitation. At higher revs the engine seemed to be a slightly down on power. Thinking the problem was related to vacuum, fuel delivery and improper fuel air ratio, I spent a lot of time looking at things in this area, but how completely wrong I was.
This "how to" was inspired by seeing Andy Woo's "how to" web page and a desire to pass on what I had experienced in this area with my own Z. It took me 2 months to sort out the problem on my car, and I certainly learned a lot on the way. This was the first time I had ever worked on a fuel injected car, and prior to that, had only done routine adjustments on simple carburettors and Kettering (conventional) ignition systems.
This article isn't intended to be a complete treatise on electronic fuel injection diagnosis. I've written this simply from the point of view of a do-it -yourselfer, and I hope that anyone who has stumbling problems with their Z will read this and come away with some thoughts on what to do next. You may decide to fix it yourself, or you might want to profile the problem to enable an expert to pinpoint the solution quickly.
If you are going to fix it yourself, then you must invest in a service manual because it has the detailed diagnostic tests you can do, and a more detailed description of components which can go faulty- about 190 pages worth.
While this article concentrates on the 90+, principles outlined here also can apply to earlier Z models, and to other electronically managed cars.
Page numbers referred to in the Nissan 300ZX Service Manual are taken from the 1990 edition in English. Page numbers may vary according to the edtion.
If you have any comments on this article, you are welcome to send them
to me at schong@xtra.co.nz
2 Hesitation & Stumble
Different owners seem to describe this problem using a variety of expressions. Here are some: Stalls at idle, stalls when I put the clutch in, stalls when I turn a corner, misfires, surges, no power, cuts out, no power at top revs, runs rough, etc. It may well be that these events are the hesitation & stumble problems described in this article.
There are more than 33 items, which if faulty, that can cause engine
hesitation and stumble problems.
3 Basic Causes of Stumble
As with engines before the days of Electronic Fuel Injection (EFI), stumble had two basic causes- incorrect ignition and incorrect fuel/ air mixture for the required operating condition.
With computer controlled EFI, the computer or any of its sensors or actuators can go faulty, and when this happens you can get, you guessed it- incorrect ignition and incorrect fuel/ air mixture for the required operating condition, thus engine stumble. Here is the list of items on the 90+ that can be sources of this problem (no particular order):
Do you get the idea now that if you're having problems that it could
be anything? So where do you start? If the problem is intermittent, you
may never find it. As another example, I still have a 1987 Mitsubishi Starion,
which ran perfectly for 35,000 miles. Then it developed an intermittent
hesitation problem- you would be cruising at 60mph, on a 400 mile trip,
ease off the gas pedal, and suddenly for 1/4 second, it was as though someone
had switched off the engine and then turned it back on again. The car would
then run faultlessly for the rest of the trip. This happened 4 times in
a period of 1 year, then never happened again. The car has now done 70,000
miles and run perfectly ever since.
4 Left and Right
Left and right in this document is with reference to someone sitting
in the driver's seat facing forward.
5 Start by Looking for "Conventional" Faults
There are many ways of tackling this problem. One way is to divide the problem into 2 parts- one which involves locating "conventional " faults and the other deals with the computer controlled aspects.
Conventional fault tracing involve basic checks such as vacuum leaks, bad fuel, wiring faults, and worn or fouled spark plugs, loose alternator belt or faulty alternator. Sticking inlet & exhaust valves, worn valve seats can also cause intermittent power loss or rough running. Here are some tips:.
5.1 Vacuum leaks
It may seem obvious, but a number of IZCC members have posted a cry for help because their engine was stumbling, and later reported they had forgotten to secure a pipe or hose, or found their intercooler had a hole in it from a parking incident!
5.2 Bad fuel
For areas where fuel formulations change seasonally (see article "The Truth about Winter Gas" in Andy Woo's "How to" section), this can cause a problem. Three years ago here in New Zealand, the local refinery ran short of production, so the local gas companies decided to import a boat tanker load of refined fuel from Asia. They did this without informing the general public. Suddenly, some cars ran really badly, and after about a month, it was eventually traced to this bad batch of fuel. The moral of the story is: fuel quality is not always constant.
5.3 Wiring faults
Is your hesitation problem intermittent? If so the chances are that its an electrical connection- whether it be a connector, a relay contact, or a crimp joint in the wiring, or a soldered joint on a printed circuit board. Are there any signs of green deposits on wiring harness connectors or sensor connectors? Note that wires are crimp jointed to the connectors, so not only can you get contact failure between the male & female part of the connector, but also at where the wires run into the connector. I've noticed connectors at the front of the engine (the two temperature sensors) are much more corroded than those at the back of the engine (exhaust gas sensor, variable valve timing control solenoid etc). The other connector which can get really dirty, is the fuel pump connector, located on the outside of the car, but accessed through a panel underneath where the spare wheel is.
If you are experiencing intermittent problems, you might find page EF & EC 47 in the manual helpful. Here, there are some tips on how to try and force an intermittent fault to show up. For example, race the engine rapidly to see if engine movement causes electrical breaks, wiggle connectors etc. It may be necessary to connect up LED's (light emitting diodes) at various points in the circuit, so when the fault occurs, you can spot it immediately.
After many years, connectors can be a source of problems. Unplug any suspect connectors and squirt some WD 40 or CRC 556 into it. Inspect the wires that go up to the connector closely. If the copper in the wire has a coating of copper oxide (black colour), then you may have to dismantle the connector, clean up the wire and solder it to the terminal. What happens here is that black copper oxide is an insulator, so over time your crimp joint can go open circuit as the surface of the copper wire turns from copper to copper oxide.
5.4 Spark plugs
Are you having problems at high engine RPM (4000-7000) and wide open throttle (WOT)? If so it could be spark plugs. As the engine RPM climbs, the voltage supplied to the spark plug by the ignition coil drops off slightly. ( Direct ignition is used on this engine to significantly reduce this effect, but it still happens). In addition, as the compression in the cylinder rises (under WOT), the voltage required to jump the spark gap also increases.
If your spark plugs are worn, then the gap may be greater than normal, and also, it requires a lower voltage to jump from a sharp surface than a round surface. A worn plug will have rounded surfaces from which the spark jumps. If you have other problems such as incorrect mixture or excessive oil consumption, these will tend to put coatings on the plug which will raise the voltage necessary for a good spark.
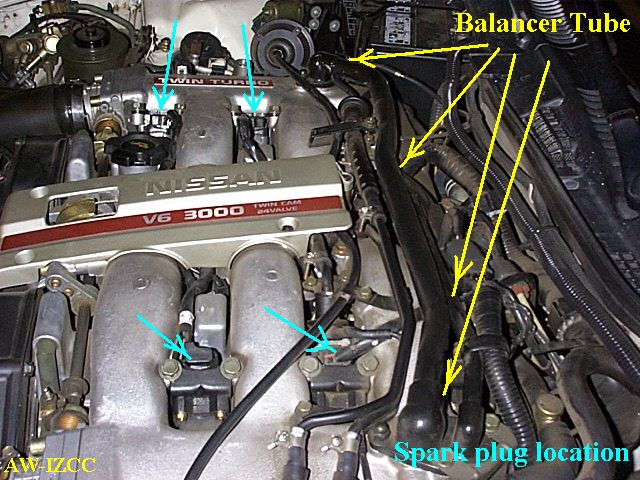
Also check the connectors and wiring between the 6 ignition coils and the transistor ignition unit, located at the front of the engine, above the alternator on the plastic cam belt cover.
Its actually quite easy to remove the spark plugs- first remove the
ignition coil, and in the case of plugs 5 & 6, undo the balancer tube,
roll it back to give enough room to withdraw the plugs. Be careful not
to damage the balancer tube O rings, which you can reuse. When removing
the ignition coil connector and coil, bits of dirt and broken connector
plastic can fall into the hole where the spark plug is located. I put a
plastic PVC pipe- small enough to go down the hole and big enough to go
around the spark plug, then attached a vacuum cleaner hose to the end of
it to suck out dirt that went down the hole.
Spark Plug Location :

Balancer Tube Location :
5.5 Alternator belt/ alternator/ battery
Is the problem is related to heavy electrical load?
When the alternator belt is correctly tensioned, it is able to deliver all the power required by the alternator. When it is loose, it will transmit a certain amount of power, then slip. This slipping can go on quietly, and therefore unnoticed. What can happen in this case is that the alternator can still supply power to charge the battery to start the car, but insufficient to charge the battery and supply a heavy electrical load- lights, air conditioning, stereo, wipers, rear window heater, turn signal etc.
Also, its possible for the alternator to be faulty and not be delivering full output without illuminating the charge warning lamp. An alternator can have blown main diodes, faulty exciter diodes, a faulty regulator, which can cause low output without bringing up the warning lamp. I'm sure you folks with your 1000W stereo systems can relate to this!
At the point that the electrical load becomes too heavy for the alternator & battery the voltage starts to fall, and so does a whole host of other things- ignition, fuel delivery, and the on board computers- and on comes the stumbling problems.
An electronic fuel injection system therefore relies on a good electrical power supply to function, so you need to make sure your battery, battery terminals, and charging system is in top condition.
A simple way to test the battery terminal is to start the car when cold then immediately feel the battery terminals. They should be cold. If not, there must be a voltage drop across the battery terminal lug. Remove the terminal & clean it up. Another way is to put a voltmeter on the battery terminal lugs and measure the battery voltage while you start the car. It should not drop below 10 volts.
Interestingly, older Zs used to have voltmeters as part of the instrument cluster, so it was easy to keep an eye on this sort of thing.
You can deliberately load up the electrical system to determine if the problem is load related. Turn on the lights, heater fan, rear demister, wipers, stops lights- by operating the bake pedal, cigar lighter. If you bring on the problem, then at least you have clue number 1.
To check the alternator belt tension, I bought a simple spring scale, the sort of thing you use to weigh fish with, from the local hardware shop for about $3US. Put the spring scale 1/2 way between the alternator and crankshaft pulley, pull on it to 22lbs (10Kg), and check the deflection doesn't exceed 0.453 in (11.5mm). If it does, readjust so that deflection is in the range 0.28-0.31 in (7-8 mm) for a used belt or 0.256- 0.295 (6.5- 7.5mm) in for a new belt.
A full procedure for checking the alternator is described in the manual
on page EL 26.
6 Trouble Shooting the Engine Management System
Now comes the harder part- doing electronic fuel injection (E.F.I.) diagnosis.
I think the easiest thing to do is head for the engine management computer, called the ECU (electronic control unit), and put it into diagnostic mode. This will do some basic tests for you, so why not make use of it? This is quite simple to do, and nothing to be afraid of. If you have Nissan's workshop manual, you'll also see the expression ECCS. This stands for Electronic Concentrated Control System and refers to the ECU plus all the sensors and actuators connected to it.
One important thing to remember about the ECU is that it can tell you if the inputs are functioning abnormally (engine temperature, air flow etc), but it can't tell you if its outputs are correctly actuating the target device ( boost control, emission gas reticulation solenoid etc).
The other thing to note is that the ECU only indicates a fault if it detects a voltage which is out of limits, not if its a wrong voltage. For example, the air flow meter normal output range is 0.8 to 1.6 volts. If the ECU detects 0 volts, it registers a fault condition. However, if the air flow meter is faulty and putting out a voltage in the range 0.8 to 1.6 volts, then obviously the ECU is not going to register a fault.
NEW
Run the ECU diagnostics to determine what faults are being detected. Click here for procedure, which also covers the removal of the ECU and its connector.
Note: at this point I actually left the ECU out so I could make voltage measurements at its connector. I've often run the car without bolting the ECU to the chassis without any problems. The ECU circuitry is connected to "ground" through the wiring harness and seems to run well without the "ground" circuit via its metal case.
end NEW
Is everything OK, but your car is still hesitating? If so you need to carry on but from now you will need to have a volt meter which can also measure resistance (ohms), and current (amps). You can buy a cheap one at your local electronics store- Radio shack etc. Shouldn't cost you more than around $20 US.
Note: if you are going to make measurements on the exhaust gas sensor
you will need a analogue meter that has a FET (field effect transistor)
input, or a good quality digital meter.
7 The Problem arises when the engine is cold
If the problem happens when the engine is cold, but tends to disappear once the car has warmed up, then it may be related to faulty components that affect cold/hot operation behaviour- the engine or air is cold but the computer doesn't know about it because of sensor circuit failure, or the computer knows its cold, but the various actuators or circuits aren't functioning correctly to change the engine inputs: fuel & air.
Keep in the back of your mind, though, that the reverse can happen- the engine is actually hot, but the ECU thinks its cold!
7.1 Hesitation when the engine is cold (Page EF &
EC 78 in the manual)
PCV valve on LHS :
PCV valve on RHS :
After checking the spark plugs as described in section 4.4, check the PCV (positive crankcase ventilation) valves and hoses. There's one on each side of the engine. Use a pair of pliers to crimp the hose by the valve to shut off the air supply to the inlet manifold. If the engine speed goes up, or becomes more stable, then you've located the problem.
To check operation of the valve, pull off the hose from the valve (this will require a bit of patience and grunting. If the valve is working properly, you should hear a hissing noise from the valve with the engine running at idle. Put your finger over the valve and you should feel a strong vacuum.
If that's OK, then you're onto the air flow meter. The air flow meter is a hot wire type. As more air passes over the hot wire, more current is required to maintain the same hot wire temperature. If the air is colder, again more heat will be lost from the hot wire, so there's no need for a separate air temperature sensor. The current is dropped across a resistance and measured by the ECU as a voltage, which is interpreted as an air flow.
Air Flow Meter :
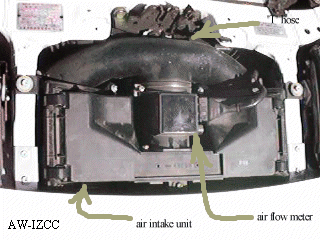
Air turbulence in and in front of the air flow meter has been blamed for many hesitation problems. The theory is that the air flow meter will give a false output to the ECU, as the flow over the hot wire will not be representative of the flow across it's section. Here are some past postings on this subject (edited):
"From: Amit Kumar akumar@cs.tamu.edu
Date: Fri, 1 Dec 1995 11:48:27 -0600 (CST)
Subject: <300> Engine cutting out under braking
I've had this problem ever since I bought the car ('91 TT) 3 months ago. The engine cuts out under hard braking (normally from 55+ mph) with the clutch pedal fully depressed. ( I guess the clutch not getting fully disengaged could cause the RPMs to drop too low - but I don't think this is the case.) If I engage the clutch again or turn the key, it will start right up. It's pretty scary when this happens while going around a curve, since it causes the power steering to cut out as well. Doesn't do too much for my confidence! Somehow this problem never occurred during the (fairly long) test drive, but started to happen 2-3 hours after I took possession. (Actually, it may have once, but at that I think I may've thought (!) it was something I'd done wrong.) The dealership that sold me the car said they were unable to duplicate the problem since they were unable to take the car over 55 mph. (At that time the problem occurred only at above 70 mph.) They did agree to let a service guy ride with me while I tried to duplicate the problem, but we never got around to it since I moved out of town the next day. The service guy at the next dealership I took it to immediately told me it was a problem with a transistor that was causing this to happen, and that it would be fixed under a recall. Well, the work they did seems to have done something, since it doesn't happen as frequently anymore. However, now that I'm not able to duplicate the problem at will, it's harder to show them what's happening. Has anybody had (or is having) a similar problem with their late-model Z? I'm planning to take it to a different dealer, but it'd be nice if I knew what the problem was, so I could tell them exactly what I need done.
Muchos gracias.
Amit
'91 TT
From: MaxBoost@aol.com
Date: Sun, 3 Dec 1995 15:53:11 -0500
Subject: <300> Re: Engine cutting out under braking
Seeing that it is a used car, it may have been in a front end collision. When the front end is repaired the plastic inner fender may be loose or missing. If this is the case, the airflow from the front tires at highway speeds disturbs the airflow into the engine inlet ducts. These ducts are located in front of Both tires and lead to the air flow meter in the center of the car. If the airflow through the airflow meter is disturbed, it can cause an engine stall with the clutch depressed. You should check the inner fender panels or install a pop charger and gain some HP and the problem.
MaxBoost
85 300ZXT
From: vickrey@cts.com (Donn Vickrey)
Date: Sat, 9 Dec 95 09:48 PST
Subject: <300> Re: Engine cutting out under braking
Amit -
The missing fender theory is a likely cause of your problem. The
Z airflow meters are very susceptible to turbulence and that can cause
the idle to dip abnormally low and can even cause stalling. If you do switch
to a POP charger filter, make sure that you reinstall the plastic tray
that fits under the stock air intake box. Otherwise, the POP charger can
be susceptible to the same problems.
Donn Vickrey,br> '78 280Z,'90 300ZXTT
IZCC #443, ZCSD #56
From: Amit Kumar akumar@cs.tamu.edu
Date: Mon, 11 Dec 1995 10:41:34 -0600 (CST)
Subject: <300> Re: Engine cutting out under braking
I spoke with Clark at Wolf Tech and somebody at Stillen last week about this. While neither of them could think of any reasons, they both agreed that it sounded like a plausible explanation. Meanwhile, I've ordered the fender skirt (or whatever it's called) at the local dealer. Hopefully, putting that in will solve the problem. I've also decided to go with the pop-charger to make sure my engine doesn't take a drink of stagnant water anytime soon.
Amit
'91 TT"
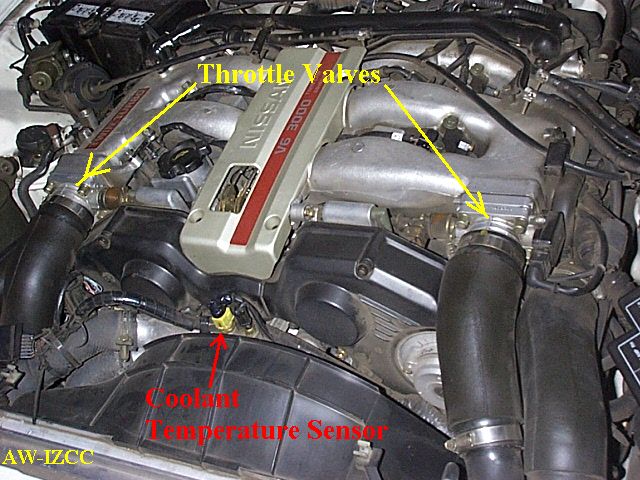
Throttle Valve Area :
NEW
Remove the hose and you see the throttle valve directly :
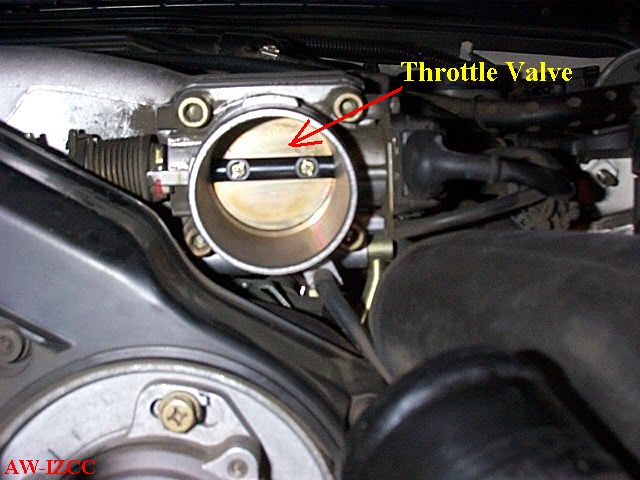
end NEW
Next are the Throttle valve deposits. For this you will need some carburettor cleaner. Over time, a black sludge builds up behind each of the two main throttle valves. I suspect this comes from the EGR (emission gas recirculation) input which is fed in through a hole just behind the valves. These deposits block air for small throttle openings, hence causing a momentary hesitation as the main valves open.
Another source of problem not mentioned in the manual under hesitation
when cold is the temperature sensor & connectors.
Coolant Temperature Sensor/Connector :
There is description for a procedure
on how to clean the coolant temperature connector. Click here
for procedure.
The left hand sensor senses for the ECU, the right hand one operates the temperature gauge. Although both connectors are prone to corrosion, the sensor connector for the ECU is much more prone despite the fancy construction. To check, roll back the rubber around the connector and put a volt meter between ground and the yellow/green wire. Start the engine from cold, and you should see the voltage rise progressively from 5 volts to almost 0 volts.
If the temperature sensor circuit is open or shorted, the ECU assumes the engine temperature is 20 deg C or 68 deg F while starting, then when running, assumes the engine temperature is 80 deg C or 176 deg F. Here's a report from Peter Garcia (edited):
Subject: <300> Hesitation solved!
Hello everyone,
First of all thank you very much for your help in trying to remedy
my situation. I am sorry to say though that although I tried everyone's
various suggestions, the reason for my hesitation was due to something
different. Today, I turned on the car and warmed it up as usual, and then
drove it around the perimeter of the campus. The car was still hesitant
and it was REALLY starting to get on my nerves. Anyway, I parked the car
and did as someone suggested and checked the spark plug assemblies to see
if they were loose or something. Weirdly enough, one of them did kind of
click into place after I pushed on it. So I thought hey, that could have
done it! WRONG!!! As a result, the car started to drive very, very, very
badly. It was missing, and the car wouldn't want to move. Big time loss
of power! The engine sounded like crap! It scared the heck out of me. Anyway,
I immediately called Nissan to see if I could take it in to the shop and
they said that they couldn't see it until Friday. I explained to them that
I needed the car for work and that I didn't want to drive the car like
it was for fear that I would damage something else. (By the way, the guy
knows me by now from other maintenance checks, and because there aren't
many 300ZXTTs in David Koresh Town, U.S.A.) Anyway to make the long story
shorter, he fitted me into his tight schedule and actually found the problem!
(That's pretty good for a rinky dinky town like this one) The part you've
been waiting for: the computer coolant temperature control sensor (as he
called it) was telling the car that the coolant temperature was -2 degrees.
Therefore it made the car run very rich. The sensor cost a whole $23, but
the labor, and another spark plug which was ruined because of the problem
tallied it up to $103 and change. After driving it around town today and
tonight, I must say that the Z's ready to kill once again!
I hope that this helps everyone who has been having similar problems.
If you have forgotten, this goes for my car which is a 1990 TT. Once again,
thanks for listening and helping out! I REALLY appreciate it!
Yours truly,
The one who's car every boy on campus wants,
Peter Garcia
Baylor University
IZCC #1065
1990 300ZXTT, 1985 300ZXT, and
'79 280ZX
7.2 Stalls when the engine is cold (Page EF & EC 85 in the manual)
There's a fine line between a hesitation and a stall in my opinion. You can get hesitations ranging from slight to deep. If its too deep, it can turn into a stall. Anyway, when an engine is cold, it requires a more fuel for a richer mixture, and a higher idle speed to reduce the risk of stall.
[Pic of air regulator, and ACC/ FICD combo unit . Andy, to find the air regulator, locate the balancer tube. You see the middle of the balancer tube has a pipe going off it going down to the back of the engine, This pipe goes to the air regulator. Un-slip those two connectors to get a better view of the air regulator. Looking from the front of the engine, you see also that the balancer tube has another small pipe running parallel to it from the center over to the right. This pipe carries the idle air, and the extra air that the engine requires when the air conditioning compressor operates and the engine is at idle. This pipe looks like goes into the main inlet manifold on the right, but actually goes into a separate chamber to which the ACC/ FICD combo unit is bolted. You'll see 2 connectors connected to this combo unit. The connector that sticks up is the AAC valve, and the other is the FICD valve which is hexagonal in shape. You'll see the idle screw on this unit which faces the wheel]
NEW
end NEW
Fast idle and idle control is determined by the air regulator, the Auxiliary Air Control (AAC) valve and the F.I.C.D. (fast idle control device) valve. As shown in the picture, these items are located at the back left (right if your standing in front of the car) of the engine, behind the inlet manifold.
The system works like this. Air is taken from left hand main air feed pipe (on the NA this pipe connects to the inlet manifold, on the TT the pipe is the one that is connected to the air output of the left hand turbocharger) via a 1 inch external diameter pipe and routed to the back left of the engine, then to the air regulator, Auxiliary Air Control (AAC) valve and the F.I.C.D. valves, then eventually into the centre of the balancer tube. The functions of the 3 valves are as follows:
Air regulator valve- opens when the engine is cold, to fast idle the engine. It contains a thermostat arrangement and an electric heater element which forces the thermostat to gradually shut off the air supply. The air regulator heater element is switched on by the fuel pump relay, which in turn is operated by the ECU.
Auxiliary Air Control (AAC) valve- This is under the direct control of the ECU, and is for fine adjustment of the engine idle speed. It is pulsed on & off to bring to idle to what is set in ROM. Notice it has screw in it ( see picture). This sets the minimum the idle speed. The ECU computes engine speed from input from the crank angle sensor, so if you are also having idle problems, it could be the crank angle sensor & circuit, in which case you may be experiencing hesitation due to misfiring.
F.I.C.D. valve- This is also under the direct control of the ECU. It is turned on to bring engine speed back to the correct idle speed when the air conditioning compressor is switched in. If your engine stalls when you hit your air con or demister switch, this could be your culprit.
If any of these items are faulty, it's likely you'll experience problems when the engine is cold. Pages EF & EC 154-159 in the manual describe test procedures- electrical tests and checks for clogging, broken springs etc.
To get the connectors off the AAC and FICD valve, I recommend the rubber hoses be removed first. Otherwise it's almost impossible to get the connector clip undone (took me an hour).
NEW
If everything checks OK at this point, then do the ECU diagnosis, as
described in section 6.
endNEW
7.3 Hesitation under normal conditions (Page EF & EC 79 in the manual)
NEW
Again, spark plugs, and PCV leaks and exhaust gas sensors ,
also referred to as oxygen sensors, are possible suspects here. (See sections
6. If the ECU turns up an OK result for the exhaust gas sensor, be careful,
as it still may be faulty. The exhaust gas sensor consists of the sensor
itself and a heater. The sensor generates 1 volt for a rich mixture and
0 volts for a lean mixture. The white wire is the sensor output, black/red
is heater supply, and black is ground.
end NEW
Because my ECU gave a good test result for my exhaust gas sensors, I never actually did any detailed tests on them. However, here's what Daniel Bliley says:
From: "Daniel Patrick Bliley" dpbliley@eos.ncsu.edu
Date: Wed, 8 Oct 1997 00:05:35 -0500
Subject: all What does oxygen sensor really do?
The oxygen sensor actually senses the differential in atmospheric oxygen content and exhaust oxygen content. The sensor is hollow and both the inside and outside are coated with platinum. The inside is indexed to the atmosphere. The differential causes a potential (or voltage) to be created by the sensor. The greater the differential, the greater the potential. An oxygen sensor puts out anywhere in the neighbourhood of 100 to 900+ millivolts. 450 mV is considered the ideal point (the perfect stoichiometric ratio). Anything below indicates a lean condition; anything above indicates a rich condition. This signals the computer to make adjustments to the mixture.
You'll notice that many catalytic converter manufacturers recommend that you make sure your O2 sensor is functioning properly before replacing a clogged or melted-down converter. Simply put, the converter may overheat if it has to catalyse too many raw hydrocarbons. Its monolithic ceramic core may even reach melting temperature. In other words, the O2 sensor is vital to several emissions control aspects of your car.
You can check your O2 sensor's output with a simple digital multimeter set on the smallest voltage increments (NOT analog, as they are generally not sensitive enough and may even use excessive amounts of voltage that may render the sensor useless). You can see how the O2 sensor's output changes with varying throttle positions, and you can even introduce a little propane gas into the intake to richen the mixture. The O2 sensor should respond quickly to varying conditions; one that doesn't may be excessively carbon fouled. Check it out; it's sorta fun!
Dan Bliley--dpbliley@eos.ncsu.edu
Undergrad, Mechanical Engineering
North Carolina State University
IZCC #1003, Triangle Z #37
'79 Datsun 280ZX Coupe
'87 Acura Integra -- pocket rocket!
Also a comprehensive description and test method is also described at Marc Sayer's site, in the technical section.:
http://www.efn.org/~msayer/zcm
Another potential source of difficulty is the fuel evaporative emission control system, also found on earlier Zs. This consists of the fuel cap which contains a vacuum relief valve, a canister filled with activated carbon, a fuel check valve between the fuel tank and the carbon canister, and 2 pipes to the inlet manifold. The general idea here is that when the car is not in use, fuel vapour is captured by the carbon canister, then sucked from the canister when the engine operates.
Although not stated anywhere in the manual, I think the what can happen is this: if there is a problem in the fuel evaporative emission control system, you can get too much vacuum in the tank which then prevents the fuel pump from delivering full fuel pressure to the injectors.
It won't help either if your fuel filter is clogged, or if there are problems with your pump, and when your Z gets to over 20 years old, rust inside the fuel lines. If you want to change or check the fuel filter see Andy Woo's "how to change the fuel filter"
NEW
Fuel Filter (LHS):
end NEW
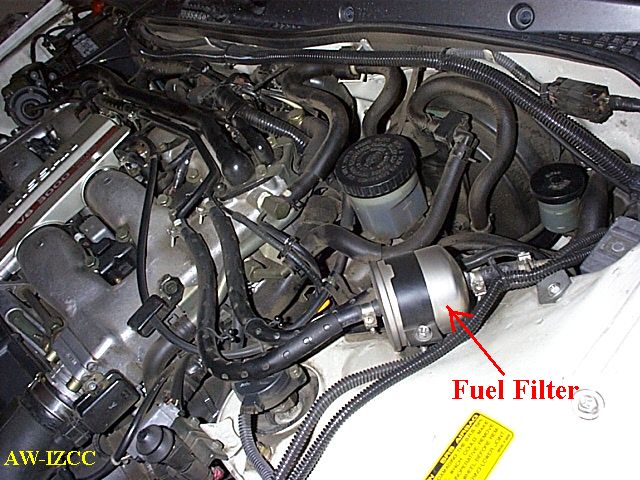
When I changed mine, it was slightly clogged ( a black deposit) , and reduced the fuel pressure by about 2 psi across it. Fuel pressure is around 43 psi, more about that later.
To test for this condition, disconnect the canister purge hose & plug it.
NEW
[PIC of carbon cannister purge line]
[Pic of hose entry point to inlet manifold]
end NEW
I recommend undoing the fuel cap and releasing the pressure in the fuel tank too. This hose is located in the area of the throttle position sensor, on the front left hand side of the intake manifold. Its easy to pull off, and its only a little hose.
Go for a test drive & see if the hesitation disappears.
If you want to remove the carbon canister for checking (there's a valve in it), allow for a bit of cursing if your car is a TT. To get at mine, I had to remove the front bumper. It's located next to the left hand intercooler. Of course, in my case there was nothing wrong with it.
7.4 Stalls when stepping on the Accelerator Momentarily (Page EF & EC 87 in the manual)
If you haven't already done so, check the A.A.C. valve as described in section 6.2. I guess the theory here is that if this valve is open, the initial fuel/ air mixture will be too lean, giving rise to a stall. If the valve is jammed open, your car may still be idling correctly if some one has already adjusted the idle screw to compensate.
NEW
[Pic of injector connector location]
end NEW
Next is what the manual calls the power balance test. This is
where you run the engine and try and determine if one of the injectors
is faulty by disconnecting the injector connector harness from each injector
in turn to see if there is a "momentary engine speed drop". If there isn't
there could be a problem with that cylinder' s injector or spark. The manual
uses the word momentary because as soon as the ECU detects an idle speed
drop, it attempts to compensate for it. I found it easier to listen for
an additional roughness in engine idle, which is quite noticeable. This
power balance test is easy if you have a Consult (Nissan's diagnostic computer),
because the consult can command the ECU to drop power off each injector
in turn. It's a bit of a hassle to actually get at the injector connector,
especially injector number 5, so what I did was pull off the spark coil
connector instead. I figured it wouldn't do to much harm if I did it just
for a few seconds.
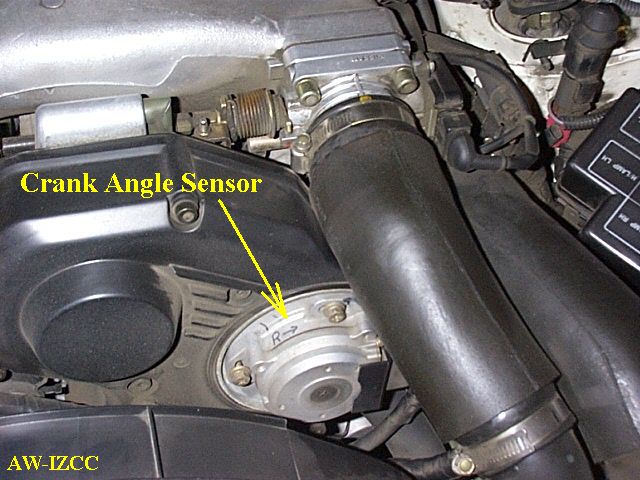
Crank Angle Sensor (near LHS Throttle Valve):
[
If there looks like there's a problem here, mark the crank angle
sensor so you don't have to reset the timing, then remove it (3 bolts).
Turn the ignition on, don't start the car, turn the crank angle shaft and
check that each injector makes a clicking sound.
If there's a problem, check the circuits, bearing in mind that the crank angle sensor triggers the ECU, and the ECU in turn pulses the injector.
I never dismantled my crank angle sensor (made by Mitsubishi), but a description of it is on page EF & EC of the manual. It works as follows: The crank angle shaft rotates a disc with slits in it. There 2 sets of slits. According to the manual, the outer set on the disc contains 360 slits, the inner set 6 slits. There are 2 LEDs on one side of the disc, and 2 photo diodes on the other side of the disc. As the disc rotates, it interrupts the light beams between the LEDs & photo diodes, producing a pulse stream, which is fed to the ECU via 2 separate wires as 1 degree signal and 120 degree signal. There's also some electronics in the crank angle senor which squares up the pulses from the photo diode for the ECU.
I'm not quite sure why there aren't 720 slits on the disc to get the 1 degree signal (maybe there are) because when the engine crankshaft rotates 360 degrees, the crank angle sensor, because it's driven off the left hand exhaust camshaft rotates only 180 degrees. Perhaps some one can enlighten me on that.
I have heard of several instances where hesitation was traced to the crank angle sensor or it's connector. Russell Siebert reports:
"Date: Wed, 13 Dec 1995
From: roptix+ix.netcom.com (Russell Siebert)
Subject: 300zx TT Engine Missing
I was having problems with my engine missing on my '90 300TT a few months ago. I took it to the dealer at least 5 times for it. The last time they still could not find the problem, just costing me a load of $. Any way, I asked to talk with one of the techs there. I explained what was happening, he opened the hood with engine running wiggled a connection which killed the engine. He proclaims "Well, there's your problem."
Apparently, the connection to the crank angle sensor can get loose and corroded, compromising the connection and causing an irregular miss. He cleaned and crimped the connections and no problem ever since. The crank angle sensor connection is on the front right side as you are facing the engine a little under a large air hose. Be careful not to get your hand caught in the fan if you try and check out this possible problem.
Russell 'Silky Smooth' Siebert
'90 300TT"
[Pict of coil]
Next on the hit list is the ignition system: timing and spark check.
Ignition timing I went and bought a timing light, and made up an adaptor so that I could connect the timing light sensor. To make the adaptor, I went to the automotive shop and bought some high tension wire and the end bits to make up in effect an extension cord. To make the chord stiff enough to push down into the hole and onto the spark plug, I sleeved the high tension cord with an aluminium tube.
Remove the number 1 coil and attach the adaptor & timing light.
The engine timing should be 15 plus or minus 2 degrees. If I would have done this test first, I would have found my hesitation problem immediately, but I wouldn't have learned so much.
Spark test
I tried to do this test outside in the bright sunshine, but found I couldn't see the spark very well (no smog here). So either do it at night or in the garage with the door closed, and you'll not only see it clearer but you'll see any spark leakage, i.e. where the spark is jumping from places other than the plug tip.
Date: Tue, 16 Jan 1996
From: roptix@ix.netcom.com (Russell Siebert)
Subject: <300> Hesitation
For those having problems with hesitation, try Tim's suggestion of checking the spark plug assemblies. The #5 was loose on my 90 300TT just like Tim's. It would also be worth checking the crank angle sensor connection which is located (as you are in front of the car) at the "2 o-clock" position on the front of the engine behind the fan. Mine was loose and corroded and causing a hard to trace hesitation. A little cleaning and crimping of connectors has cured that problem.
Russell
90 300TT
378 Hp
Power Transistor Unit (behind wires) :
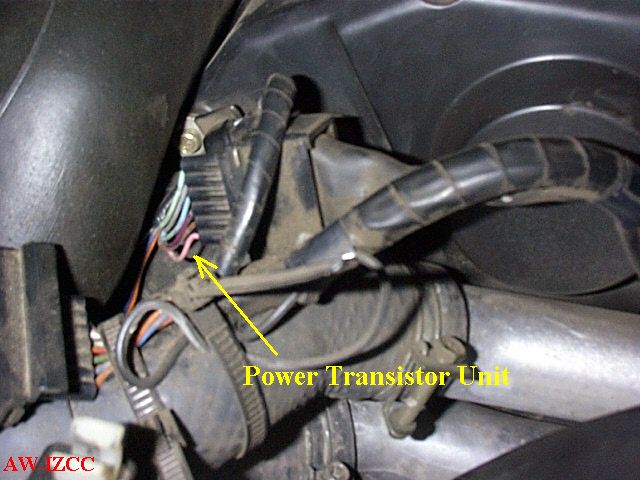
In the USA, this unit is a recall item. In other countries (Switzerland) it isn't. In some places like New Zealand, it's warranted for the first 3 years from new or first 60k miles, whichever occurs sooner.
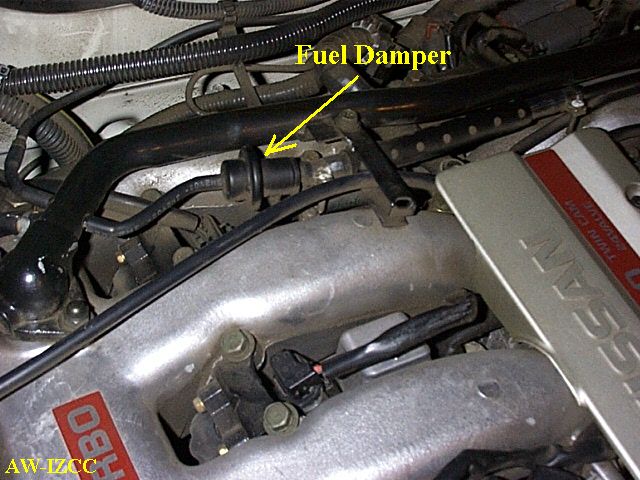
If your fuel delivery system is not up to scratch, then when you demand power, you may get hesitation, cutting out or complete stall. I fluffed around at first checking the fuel damper, fuel pump connections, filter etc, but if I were doing this again, the first thing I would do is put a pressure gauge on the fuel system.
I went out and bought an oil pressure gauge which could read to 80 psi. I think if you're going to do maintenance on these cars yourself, it pays to have an oil pressure gauge, because the oil pressure sender unit on the 90+ is notorious for reading intermittently or not at all.
The fuel pressure in the system will be in the range 35- 50 psi so an oil pressure gauge makes an ideal instrument for this check. Heres what I did:
Fuel Damper (RHS) :
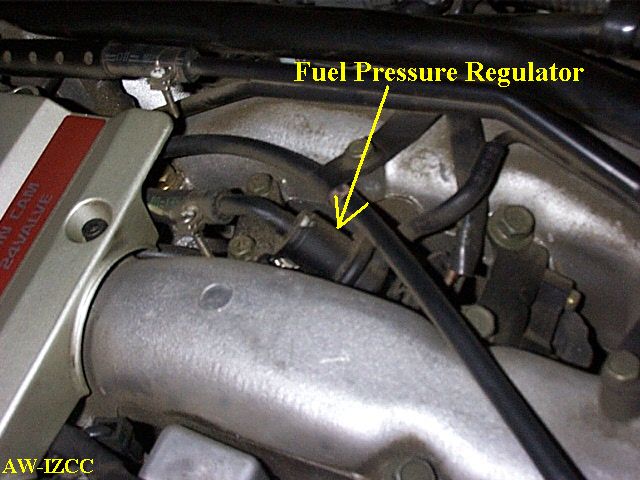
Fuel Pressure Regulator (LHS) :
Fuel Regulator Solenoid Location (LHS) :

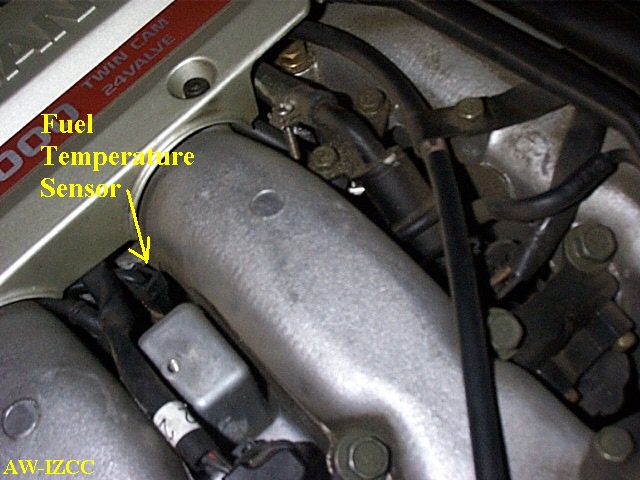
Fuel Temperature Sensor (LHS) :
"From: techsup@a-t-m.com (J. Sibert)
Date: Wed, 10 Sep 1997
Subject:<90+> Fuel Pressure Regulator
Ok guys, well, was under the hood last night cleaning things up and noticed that the vac line to the FPR was off.. I noticed no performance difference what so ever, checked the plugs, wasn't running too rich or lean..... Is this a problem? Shouldn't that have affected SOMETHING? I was thinking maybe by default the FPR was open or something...
J. Sibert
Clearwater, FL
91 300ZX TT Stage IV"
Perhaps when all is working well, the closed feedback loop involving
the exhaust gas senor enables the ECU to compensate for regulator malfunction...
end NEW
: wiring harness color coding may be different for different models. These colors are as stated in the English version of the manual. I found color coding different for the Fairlady Z model.
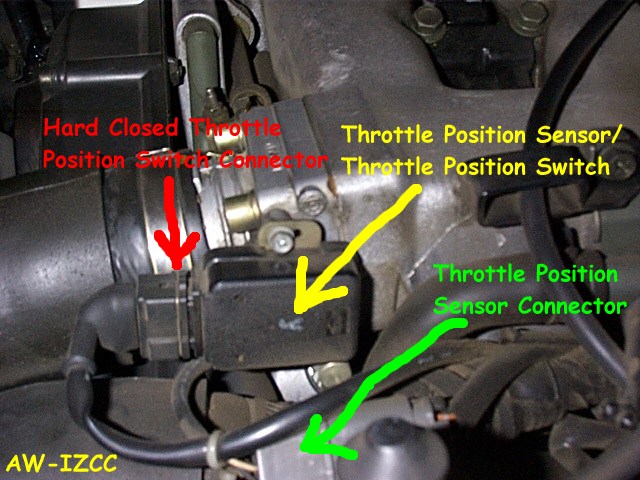
The throttle positon sensor consists of two parts: a potentiometer, and a combined idle/full throttle switch. If your car is an auto, the throttle position sensor is also wired to the auto transmission (A/T) computer. The idle switch is connected to the ECU, and the full throttle switch to the A/T computer. The bottom in line connector is for the sensor, the top one for the switch. Its a straight forward procedure to check these items. Turn the ignition on, put a voltmeter between ground and the throttle sensor orange/ blue wire. Should be 5 volts. This power source comes from the ECU. Next the white wire. With the throttle valve fully closed, about 0.4-0.5 volts. Slowly open the throttle valve and observe the voltage increase to about 4 volts, in proportion to throttle opening. Next the black wire. This is ground (grounded vi the ECU), so there should be 0 volts there under all circumstances. To check the ground circuit, turn off the ignition ( I would recommend disconnecting the battery), pull off the ECU connector, and confirm there are negligible ohms between the black wire and pin 30 on the ECU connector.
The ECU uses the throttle position sensor to determine the idle position of the throttle valve, but if it detects a sensor malfunction, it makes use of the idle switch information instead. The idle position info is used for things like "fuel cut" action, when you take your foot off the gas pedal. To check, turn the ignition on and put a voltmeter between ground and the green/red wire on the switch connector. Should read about 12 volts. Now put the voltmeter on the light green /red wire. With the gas pedal fully released, voltage should be 9-10 volts. Now push the gas pedal down a bit. Should go to 0 volts.
To get at these wires, I bared some of the insulation on the wires so I could put the meter probe on, then afterward taped them up. As I plan to keep the car, I decided I probably would want to make this measurement again in the future. An alternative would be to make up connector interface adaptor.
After chasing idle problems for about 3 months, Dave Quennell finally got to the bottom of things:
From: "Dave Quennell" d.quennell@xtra.co.nz
Subject: Idle?
Date: Mon, 13 Apr 1998 10:54:39 +1200
Yep, its FIXED!
Thanks Steve, for that draft of the dissertation on how to fix idle/stumble. It turned out to be the throttle sensor connector, managed to remove some almost chrome flake looking stuff off the make connectors! Tightened it all back up, and threw it on. All fixed, the car idles better than it EVER has! AND, no more off throttle surging etc as you come up to intersections, very annoying. Its behaving itself again!
Again thanks Steve, Tom and Henri have supplied me a lot of help on what this could be as well, all very useful stuff.
Who said these cars were complicated (ME!)
Dave Quennell
Christchurch
New Zealand
IZCC#3239
No fault found so far? Now is the time to find a straw to clutch to. Try this: Make sure the ignition is off, access the ECU, undo the 3 bolts that hold it in, remove the plastic cover that go over the wires, and undo the connector. Use a 10mm spanner to undo the connector. Make sure it comes out equally far at both ends. If you don't you may bust it. Ditto when screwing it back on. Spray some WD 40 onto both parts of the connector and reassemble. There's a tab that shows when the connector is fully mated.
A posting from Greg Pacifico (edited):
Subject: <280zx> Unplugging ECU
My '83 was running lousy for the first 5 minutes or so after start up (warm or cold). It would hesitate and feel like there was no power. It would suddenly go away after a few minutes like someone threw a switch, a timed thing, not related to temperature, speed or anything else I could figure out. I've spent a few evenings studying the service manual trying to figure it out, but to no avail. Yesterday I unplugged and replugged the ECU and just like magic, the problem's gone!
Greg Pacifico
'83 280zx
IZCC #815
I actually exposed my ECU early on in the testing so I could make voltage measurements directly at the ECU connector.
If the car is still hesitating, and you haven't found the fault, you need to check the ECU power supply and grounding (page EF & EC 105 in the manual. If all this checks OK, swapping the ECU with a known good one will reveal all.
Finally, if you've drawn a blank so far, here is a list of diagnostic procedures that pertain to hesitation and stalling that are mentioned in the manual:
A Hesitation when the engine is hot (Procedure 7)
B Hesitation when the engine is Cold (Procedure 8)
C Hesitation under normal conditions (Procedure 9)
D Engine stalls when turning (Procedure 10)
E Engine stalls when the engine is hot (Procedure 11)
F Engine stalls when the engine is cold (Procedure 12)
G Engine stalls when stepping on the accelerator momentarily (Procedure
13)
H Engine stalls after decelerating (Procedure 14)
I Engine stalls when accelerating or cruising (Procedure 15)
J Engine stalls when the electrical load is heavy (Procedure 16)
K Lack of power and stumble (procedure 17)
L Surge (procedure 19)
* + Letter above- not mentioned in the manual.
I've shown items affecting the above in the table below:
| PCV hose air leak | B | C | I | K | ||||||||
| Air flow meter | B | |||||||||||
| Exhaust gas sensor | C | H | L | |||||||||
| Fuel pressure | D | E | F | G | H | I | J | K | ||||
| Fuel pressure reg | A | D | E | F | G | H | I | J | K | |||
| Fuel Evap system | A | C | ||||||||||
| Fuel temp sensor | ||||||||||||
| Injector | D | E | F | G | H | I | J | |||||
| Injector circuits | D | E | F | G | H | I | J | |||||
| Ignition coil | D | E | F | G | H | I | J | |||||
| Ignition circuits | D | E | F | G | H | I | J | |||||
| Spark plugs | B | C | D | E | F | G | H | I | J | |||
| Transistor ignition | D | E | F | G | H | I | J | |||||
| ECU harness conn | D | E | F | G | H | I | J | |||||
| ECU pwr supply & gnd | D | E | F | G | H | I | J | |||||
| ECU | D | E | F | G | H | I | J | L | ||||
| Air regulator | F | H | ||||||||||
| Clogged idle screw | H | |||||||||||
| AAC valve | F | G | ||||||||||
| Intake Valve deposit | B | H | ||||||||||
| Battery | J | |||||||||||
| Alternator | J | |||||||||||
| EGR | L | |||||||||||
| Temp sensor | *B | |||||||||||
| Temp sens conn | *B | |||||||||||
| Throttle pos sens | *C | *G | ||||||||||
| Cone Air filter | *C | *G | ||||||||||
| Crank angle sensor | *C | |||||||||||
| Timing belt out | *E | *K | ||||||||||
| Speed sensor | *I |
Sometimes it can take a while to get the problem sorted. June 1996:
"Subject: <300zx> Bad hesitation driving ME mad.
Date: Sun, 09 Jun 1996 15:52:16 +0000
From: Ben Mehling bmehling@falco.kuci.uci.edu
My 87 300zxt continues to stutter/hesitate BADLY. The problem is
intermittent, and usually shows up when accelerating from top, but can
appear at higher speeds (sudden loss of power). I can only guess that the
problem has something to do with the fuel system. It feels like (when the
stutter occurs) a sudden loss of gas to the engine, and ends up "looking"
like I am a newbie stick driver... Here is the current time line repairs:
-bought the car summer of 94
-problem appeared in fall of 94 (Sept or Oct)
*Start taking the car into mechanics (4, in the end: my normal mechanic,
a recommended mechanic, a Z expert mechanic, and Nissan service) -None
can solve the problem. All offer up solutions.
Items replaced/repaired:
- fuel sender
- rusty gas tank (checked out, no rust)
- tune-up/ standard stuff
- air flow meter
- 02 sensor (problem disappears)
with the last, the 02 sensor, the problem disappeared for 9 months
(this repair was made in Jan-Feb 95).
- Reappears in Fall of 95 (ack!! again?!)
- Have the car looked at (even the 02 sensor), appears to be fine.
- Get the Nissan recall info / have the recall done (praying this
fixes my car!)
- Get car back, still occurs intermittently
- Now Nissan believes the muffler to be the cause (the muffler just
started to have problems and does need to be replaced...but I fail to see
how this could be my long term problem...)
- I am considering selling my "baby", it just isn't reliable anymore...
(ever?)
Any ideas that would lead me in the right direction are much appreciated.
I would prefer to solve the problem and keep this car... But if I continue
to throw good money at a problem NOBODY knows how to solve... Thanks in
advance for any advice!
Ben
87 300zxt"
With an update October 1997:
"Subject: RE: <300zx> Bad hesitation driving ME mad.
Date: Mon, 20 Oct 1997 09:08:35 -0700
Amazingly enough, I still own the Z, although it mostly sits in the garage (I drive it maybe once or twice a month).
The hesitation still occurs however, and I still consider selling it... but I am sure you know how it is - I drive it once, remember how much fun it is, and then forget about selling it!
I have since had the car looked at by a mechanic (possibly THE most anal mechanic I have ever dealt with). He had the Z for 6 weeks. Made some minor repairs to different fuel sensors and controls, fixed some connections he felt were bad and determined that he was unsure what the problem was...
You can add that to the timeline (in the posting above), as that is the only thing that I have had done to it since that was written.
As far as my own feeling goes.
1) I believe the problem to be in the electrical/fuel delivery system.
I just feel like the car has electrical problems and that is what causes
the hesitation.
2) If I warm up the car (a solid 5 minutes) the hesitation will
probably not occur, at least not really bad. However, sometimes if I drive
it hard (even after warming it up) the hesitation will show up.
3) The problem has probably occurred due to the Z spending sometime
un-garaged in oceanside community - I think the moist air played havoc
on its electrical system. I should have garaged it...
At this point I have easily poured more money into the repairs, than I originally payed for the car, and to no end.
Thanks, Ben
87 300zxt"
8. What it probably isn't
Could the problem be a stretched timing belt, causing the ignition to be retarded, hence hesitation?
I compared an new belt with one that had done 60K miles (my 91TT) and one that had done 80K miles (my 90 NA). I couldn't measure any difference in the lengths of the 3 belts. All three belts were made by the same company, Powergrip of Japan. The belt that had done 80k was so worn that every single tooth on the belt had a crack between the tooth and the belt backing. The back of the belt was also starting to show crack marks. The tensioner gap on my 91TT was still around 4mm, indicating no stretch. My conclusion is therefore, that a correctly installed cambelt will not alter the ignition timing significantly with wear.
Could the problem be the vaccum feed to the AIV (Air Induction Valve)?
The AIV is what feeds air into the main catalytic convertors. I deliberately
pulled of the feed hose, located on the balancer tube on the right hand
side of the engine, to the AIV solenoid. This allows an air leak through
a 3mm (1/8 in) diameter tube. The most noticible effect was that the idle
went up to 1100 RPM. I went for a test drive,but couldn't detect any hesitation.
If there were other leaks or problems with the car, maybe I would have
got some hesitation.
9. What my problem was
My hesitation problem turned out to be the timing belt incorrectly installed. Here's how it happened. When the car arrived from Japan, it was delivered to the port of Auckland. I was living 400 miles away at the time, so asked my father to pick it up, and he observed that it was leaking oil, a possible cause being the camshaft oil seal or front seal failure. A local garage in Auckland was contracted to fix the problem. Then when I got the car, I noticed the hesitation problem, and not being an intermittent problem, I thought it would be easy to trace. Because the problem always occurred in the transition from idle to higher RPM, I thought it must be air flow or fuel/air related- so started examining all the devices that control this.
After about 40 hours of examination, I decided to address the oil leak which had not been fixed. When I removed all three timing covers I found the timing belt on the cambelt drive sprocket to be one cog out, retarding the valve and ignition timing by 14.4 degrees.
A letter of complaint was drawn up smartly, and taken around to the garage, where there was a calm 5 minute discussion. Immediately and without any hesitation whatsoever, a full cash refund was given.
Incidentally the oil leak wasn't the seals at all- it was coming from two leaking inlet camshaft sprockets- see the supplement in Andy Woo's "how to change the timing belt"
BTW, when I got everything back together, I deliberately retarded the ignition timing by 14 degrees to observe what would happen. I found there was a loss of power, and a very slight hesitation, but nowhere as deep or prolonged as when the valve timing is out also.
Happy Hunting,
Steve Chong
April 1998
Whangaparaoa
New Zealand
IZCC #2434
Member #756 of the Datsun Z Club of New Zealand
Acknowledgments:
Thanks to Andy Woo for supplying the much needed pictures.